Tips for beginners in the classic wet shave with razor and soap
Lukas LeubaCongratulations, so you're interested in switching to a traditional wet shave . This article is intended to help beginners (1) get an overview of the most important equipment and (2) gather the most important technical information in one place. Let's get started.
Part 1: The Equipment
Classic wet shaving requires a small initial investment. However, you'll be rewarded over time, as the ongoing costs for blades and soap are much lower than with automatic razors. But beware: If you—like me—become addicted to new fragrances or razors, the financial benefit disappears immediately. So let's start with the essentials:
Safety razor – the most important thing first

A safety razor is a classic shaving tool that uses a single, reversible razor blade. It comes in several different versions: with a closed or open comb (the comb is the lower part of the razor head), fixed or adjustable in aggressiveness, two-piece or three-piece (refers to the design. Both are easy to disassemble and clean). For beginners, the closed comb is particularly recommended – it is gentler, easier to control, and reduces the risk of cuts. In contrast to a straight razor, the safety razor is much more beginner-friendly: no grinding, no stroking – simply insert the blade and get started. Shaving requires some practice, but if you maintain the correct angle (approx. 30°) and don't apply pressure, you'll quickly achieve clean results.
Despite the open blade, shaving with a safety razor is not dangerous when used correctly. The blade sits securely, the head limits the cutting angle, and the risk of injury is significantly lower than with a straight razor. Many people switching from system razors even report less skin irritation, since only one blade glides over the skin. Those who hold the safety razor steadily, change the blade regularly, and avoid repeated dry strokes will be rewarded with a close, skin-friendly shave – without any technical complications.
Razor blades – sharp and affordable

Razor blades for safety razors are so-called double-edge blades – thin, sharp, and usable on both sides. They fit almost any standard safety razor and cost only a few cents each. For beginners, it's important to know: Yes, there are noticeable differences between brands. However, experienced shavers can achieve satisfactory results with almost any blade. It's certainly worth trying out different ones to find the best combination of thoroughness and skin compatibility.
A fresh blade glides effortlessly through your beard – but if it becomes dull, it tugs and irritates your skin. As a rule of thumb, change the blade after 5–10 shaves or whenever it feels uncomfortable. Important: Always handle the blade by the short, blunt sides, not the cutting edge. Blades may be tiny, but they're sharp enough to be serious.
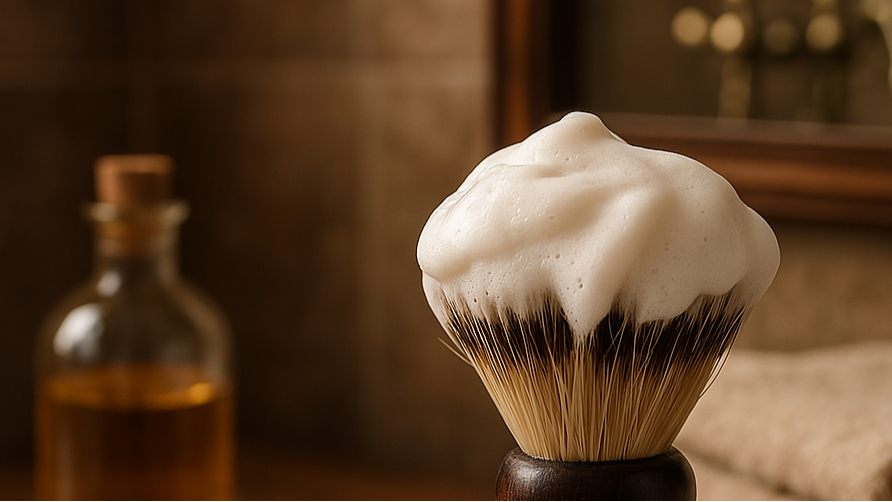
shaving brush

A shaving brush is more than just a nostalgic accessory—it's central to a good shave. It helps build lather, softens the beard hairs, and massages the skin. Important for beginners: Not every brush is the same. The differences lie primarily in the hair material, water absorption , and the so-called backbone —the resistance the hairs offer during application.
Synthetic brushes are easy to care for, dry quickly, and perform amazingly well these days. They often have little to medium backbone, feel soft, lather reliably, and are perfect for beginners, especially if you prefer animal-free products.
Badger hair brushes are considered classics – there are various grades available (e.g., "Pure," "Best," "Silvertip"). They are highly absorbent and soft, some with a fine backbone. Silvertip badgers feel luxurious, but are also more delicate and expensive. Beginners with a penchant for classic brushes often find their favorites here.
Bristle brushes (e.g., hog bristle) are significantly cheaper, more robust, and have a strong backbone—good for lathering up hard soaps. They're a bit rough at first, but soften over time. Those who like a vigorous massage will appreciate them. They're less suitable for very sensitive skin.
A good beginner's brush should n't be too big , not too soft , or too stiff . It should have enough backbone to draw lather from the soap, but be gentle enough not to irritate the skin. Rinse thoroughly after shaving, shake it out, and store it in a well-ventilated place – then it will last for years.
shaving soap

Shaving soap is the heart of the classic wet shave. It provides lubrication, softens the beard, and protects the skin from the razor. How does it differ from a canned foam? It's enormous. A good shaving soap produces a thick, creamy lather – provided you know how.
There are two main forms: hard soaps in jars or sticks, and softer soaps or creams. Hard soaps require a little more patience to lather, but reward you with long-lasting, stable foam. Soft soaps or creams are quicker to lather and are ideal for beginners.
What to consider when buying: High-quality soaps contain nourishing fats like tallow, coconut, or shea butter. Cheaper versions lather quickly but often dry out the skin. Pay attention to the ingredients—especially if you have sensitive skin: minimal perfume, no drying alcohols.
The lather should have the consistency of whipped cream—not too thin, not too dry. If it's shiny and stays firm, it's good. And: lather isn't just for decoration —massage it thoroughly into your face with the brush. This raises the hairs and improves the shave.
Shaving soap may be unspectacular on the shelf, but it's crucial on the skin. It makes the difference between a "shave" and a "well shaved." Once you get used to it, you'll never go back to spray foam from a can.
Aftershave

Applying aftershave is the final, but not least, important step in the shaving process—the final, most effective step. After shaving, the skin is slightly irritated, sometimes microscopically injured. A good aftershave soothes, disinfects, and helps the skin regenerate. There are two main types: aftershave lotions with alcohol and aftershave balms without alcohol .
Lotions (traditional, often liquid like water) contain alcohol, which disinfects the skin—ideal for preventing minor inflammation and razor bumps. A slight burning sensation upon application is normal—if you don't like it, opt for a balm instead.
Balms are creamier, usually contain little or no alcohol, and provide moisture and noticeable care for the skin. They absorb slowly, leaving skin feeling soft and smooth—especially pleasant for dry or sensitive skin.
Beginners should choose according to their skin type: sensitive skin should be cared for with a balm, while robust skin can also respond well to a classic, alcohol-based lotion. Important: Less is more – overly perfumed products can irritate the skin or compete with the scent of shaving soap.
In short: Aftershave is not a perfume, but a skincare product. Skipping this step is a false economy. A good finish not only makes shaving more gentle on the skin, but also completes the entire ritual.
Pre-shave (optional)

Pre-shaves are products applied before lathering – as additional preparation for the skin. They are usually available as oils , less frequently as creams or gels . Their purpose: to smooth the skin, soften beard hairs, and improve the glide of the razor.
Pre-shaves are especially helpful for dry skin , thick beard growth , or if you're prone to razor burn . The oil forms a thin protective layer and can help minimize irritation. Apply it sparingly to damp skin, let it work for a short time, and then lather over it as usual.
Not everyone needs a pre-shave, but anyone with skin issues or looking for extra comfort should give it a try. For some, it's unnecessary; for others, it's a game-changer.
Part 2: The Shave – in five calm, foamy acts
It's true that wet shaving requires a bit more attention than shaving with electric devices or automatic razors. Some might find this tedious, but I appreciate the attention it takes to get a good shave. And with a little practice, you'll achieve the same or better results with a safety razor and soap than with modern equipment—I promise. This section is designed to help you do that.
1. Preparation
When you do your research, most people recommend prepping with warm water or a warm, damp towel. This means washing your face with warm water or applying a hot towel to your face for two minutes. You can also take a warm shower before shaving—it has the same effect: it softens the beard hairs, making them easier to cut.
For me personally, cool water works better. I find that I cut myself less and have less irritated skin. My guess is that the heat causes the blood vessels to dilate and softens the skin—so I cut myself more easily and it bleeds more. It's best to try both options a few times.
If you like, you can use a pre-shave oil or gel – it's not a must, but a nice luxury for rough beard days.
2. Foaming
When lathering, the shaving soap is worked into a creamy lather with a damp brush, which is then applied to the skin. To optimally prepare the brush, soak it in warm water for one to two minutes before lathering. This allows it to absorb enough water. This is especially important for natural-hair brushes, less so for synthetic ones. After dipping, you can simply squeeze the brush a few times to prevent it from becoming too absorbed. There are two common lathering methods: lathering in a bowl and lathering directly on the face .
Whip the soap in the bowl using circular motions with the brush until a stable, glossy lather forms. This method offers more control over consistency and quantity—ideal for beginners. Start by placing a small bar of soap (e.g., half a teaspoon) into the bowl. Then, work the bar into a lather with your damp brush. Dip the brush in water again if you feel the lather needs more fluid.
Of course, you're welcome to purchase a specially designed shaving bowl, but it's not necessary. Most cups and bowls do a great job of lathering and are already in your household.
With facial foaming, the lather is created directly on the skin. A wet brush is loaded with soap and then moved in circular motions over the face until the lather forms. This technique massages the skin further and saves on accessories, but it does require some practice.
Both methods work well – the key is to ensure the lather is neither too thin nor too dry. The goal is a dense, fine-pored lather that softens the beard hairs and protects the skin.
3. Shave – slowly, without pressure
When shaving with a safety razor, patience is more important than speed – and the correct technique in several passes is crucial. This involves shaving off the entire area in one to three steps , rather than shaving off all at once.
The first pass is made with the grain , i.e., in the direction of hair growth. This removes the majority of stubble and is gentlest on the skin. This is followed – if necessary – by a second pass across the grain . This usually goes slightly sideways over the skin and ensures a more even result. A third pass against the grain is optional and only recommended if the skin is insensitive and the technique is perfect. This step produces the smoothest result but carries the highest risk of irritation.
Important: Every beard grows differently. It usually grows downwards on the cheeks, but sometimes wildly in all directions on the neck. If you want a close shave, you need to know exactly where your beard grows – it's best to feel it with your fingers or observe how the hair grows for a few days. This is the only way to avoid cuts and razor burn.
Always re-lather between passes – never dry shave. And: the less pressure, the better. The razor should glide, not scrape.
5. Aftercare
After shaving, your skin needs rest and care. First, rinse your face thoroughly with cold water – this removes soap residue, closes the pores, and soothes the skin. Then, gently pat your face dry, but don't rub. For small cuts, an alum stick helps: slightly moisten it and dab it on the area – it will sting briefly but will reliably stop the bleeding.
Next comes the aftershave – as we saw above: either an alcohol-based lotion for disinfection or an alcohol-free balm for sensitive skin. Both nourish and protect freshly shaved skin. Then you let it all absorb in – no rubbing, no scratching.
Conclusion:
The classic wet shave requires a little more time and attention than modern systems – but it rewards with a thorough, skin-friendly result and a more conscious start to the day. Those who embrace the ritual not only learn the technique, but also get to know their own skin better. And honestly: A smooth shave feels good – especially when you know you were in control.